

Pencil grip - FAQs
The dynamic tripod grip is considered the most efficient grip for handwriting.
There are two types of poor pencil grip:
- where the web space is closed, restricting the movement of the fingers and wrist, which makes handwriting hard work, and
- where the hand is above the writing line; such as found with a hooked pencil grip.
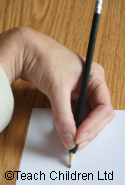


Closed web space
Hooked pencil
An open web allows the fingers to move freely, so that a fluid handwriting style can be achieved, which is why the dynamic tripod grip is considered the most appropriate for handwriting.
Open web

By the age of 8 / 9 years old it can be very difficult to get a child to change their pencil grip especially if the old grip, like the quadrupod grip (Stage 4), is very similar to the new grip the dynamic tripod grip. If their grip is not causing discomfort or hindering the speed and fluidity of their handwriting, we would suggest not changing anything.
However, if their grip is causing them discomfort or hindering their handwriting ability it is most probably too late to correct a poor grip to a dynamic tripod grip. We would recommend teaching your child the adaptive tripod grip.
Pencil grip aids generally do not correct the grip, they just force the hand and fingers into the correct position for writing. To correct the grip permanently the physical factors that have created the incorrect grip need to be addressed.
The use of grips can encourage your child to write more fluently, building their self-esteem, whilst you work on correcting the factors that have caused a bad grip to form. The long-term aim must always be to get your child to develop an efficient grip without the use of aids.
- Check your child’s pencil grip against our developmental stages - as it might be their grip is appropriate for their age.
- A poor pencil grip can be caused by weak hand and finger strength. Games and activities can be used to develop these strengths.
- To help finger positioning place colour markers on the shaft of the pencil to show where to place the thumb and index finger when a tripod grip is used. For left-handed writers these should be placed further up the shaft than for a right-handed writer.
- Focus on one point at a time, for example, keeping the little finger and the ring finger gently curled in (try placing a cotton wool ball in the palm of the hand and having the child hold it in place with the little and ring finger). Then focus on the thumb position and index finger, finally the middle finger (a special padded sticker placed on the shaft of the pencil that rests on the middle finger can help).
- Try using a triangular shaped pencil, especially good for those just learning to handwrite, but watch the middle finger as it can sneak on top of the shaft rather than underneath.
- Use pencils of the appropriate thickness for the child and their fine motor skills ability. Young children usually require thicker pencils due to their gross and fine motor skills stage. As a child’s gross and fine motor skills develop the thickness of pencil required reduces.
- Some older children will benefit from using triangular or hexagon shaped pencil shafts, moving to smooth cylindrical shafts.
- With older children, who will understand, explain why it is important for them to change their pencil grip and how it will help them to improve the quality and quantity of their handwriting and be less tiring as the hand and fingers can move more freely.
It takes time to correct a poor hand position but it is well worth the perseverance as it will enable a child to write freely and more comfortably.
A good starting point is to plan some activities which can be done on a vertical surface. The vertical surface helps to strengthen the wrist and gets the child used to the feeling of the hand being in line with the wrist and forearm, rather than hooked or at an angle.
- Place the paper on a wall, with the middle at the child’s standing chest height, so they can write or draw with their hand, wrist and forearm in a vertical position.
- Encourage them to hold any writing or drawing tools using the tripod grip (age appropriate only) if you are focusing on improving a child’s hand position for handwriting.
- When writing normally, encourage them to angle the paper appropriately as this will also help to correct a poor hand position. With the correct paper tilt, they will always be able to see what they are writing. If the paper is tilted at the correct angle for them, they will find a hooked hand position, or having their forearm further up the table, more difficult and uncomfortable to maintain.
- Some children will find writing on a sloped desk helpful. Not all children are comfortable writing or drawing on a flat surface and may benefit from the paper being positioned on an angled or sloped board. If you are not sure, instead of buying a specialist board, you could make one. Try using a ring binder or lever arch file stuffed with magazines and newspaper to make a sloped board. Tape the edges to stop the papers falling out or you could cover it in sticky back plastic to give a smoother finish to the board. The advantage of this is that you can make them to any angle of slope. Try a few to see which, if any, a child prefers. You may find that the child only needs the sloped board for a short while. It may also help to reduce the angle of the slope over time so that they gradually get used to moving from a slopped to horizontal writing plane.