

Positioning the paper correctly for handwriting
The paper position and tilt on the desk, for both right and left-handed writers, can make a big difference to a child’s handwriting experience and comfort and yet it is an element which is often neglected.
By positioning and tilting the paper correctly the writing hand stays in one comfortable position on the table and the non-writing hand moves the paper diagonally up the table (while maintaining an appropriate paper tilt angle). With the non-writing hand moving the paper up the table the writing line stays in the same place which means eye movements are less, helping to make the writing experience less tiring and stressful.
If the paper is positioned and tilted correctly, with their writing hand under the writing line, they will also be able to see more easily what they have just written and where to place the next letter, word or section of text on the page. This is especially important for left-handed writers.
The key elements to positioning the paper when handwriting
Supporting a child to position and tilt their paper correctly for handwriting
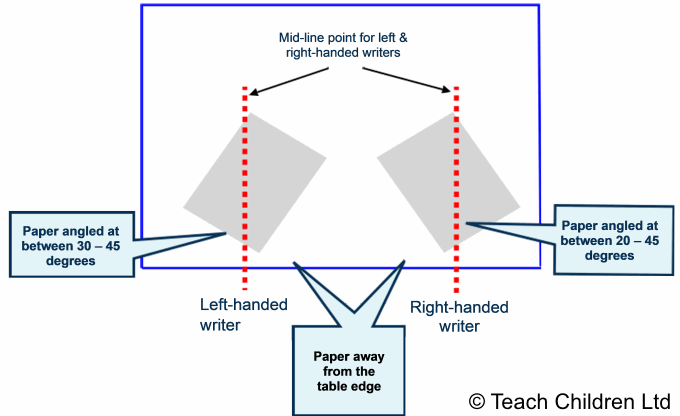
- Writing paper can be angled between 20-45 degrees to the left (anti-clockwise) for right-handed children and between 30-45 degrees to the right (clockwise) for left-handed children. Handwriting specialists tend to have a slightly different view on the best paper position angle of the slant. Try different angles to see which is most comfortable and makes writing seem easier.
- A tip for keeping the paper positioned at a 45 degree angle, until it becomes a habit, is to fold over the left hand lower corner of the paper for right-handed writers and the right hand for left-handed writers. The fold is then positioned so that it is parallel to the edge of the table closest to the child.
- The paper position should NOT be on the edge of the table but be raised so that the elbow of the writing hand is resting on the table to maintain the head and elbow triangle. This will also allow the writing hand to remain below the line of writing. For a right-handed child the lower left hand corner of the paper should be close to, but not crossing, the mid-line point (the line that goes down the body through the middle of the chest and belly button). For left-handed writers the lower right hand corner should be close to, but not crossing, the child’s mid-line point.
- Not all children are comfortable writing or drawing on a flat surface and may benefit from the paper being positioned on an angled or sloped board. If you are not sure, instead of buying a specialist board, you could make one. Try using a ring binder or lever arch file stuffed with magazines and newspaper to make a sloped board. Tape the edges to stop the papers falling out, you could cover it in sticky back plastic to give a smoother finish to the board. The advantage of this is that you can make them to any angle of slope. Try a few to see which, if any, the child prefers.
- When copying or doing spellings it may be best to place the writing to be copied on the child’s left side for right-handed writers and on the right for left-handed writers, so they can clearly see what they are copying.
Hand position for handwriting
We often talk about the most appropriate grip for handwriting being the tripod grip; but this usually only refers to finger position. It is easy to forget the importance of the actual hand position in relation to the pencil and paper for handwriting.
The ideal position is for the hand, wrist and elbow to be below the tip of the pencil and under the writing line for both left and right-handed writers.